Caching HTTP requests is a fundamental optimization technique in web development, especially in single-page applications like those built with Angular. In Angular 12, implementing HTTP request caching can significantly enhance the performance of your application, reduce latency, and improve the overall user experience.
In this comprehensive guide, we will explore how to cache HTTP requests in Angular 12 using a real-world example. We’ll also explain why caching matters, when to use it, and common best practices for optimal results.
🔍 What is HTTP Request Caching?
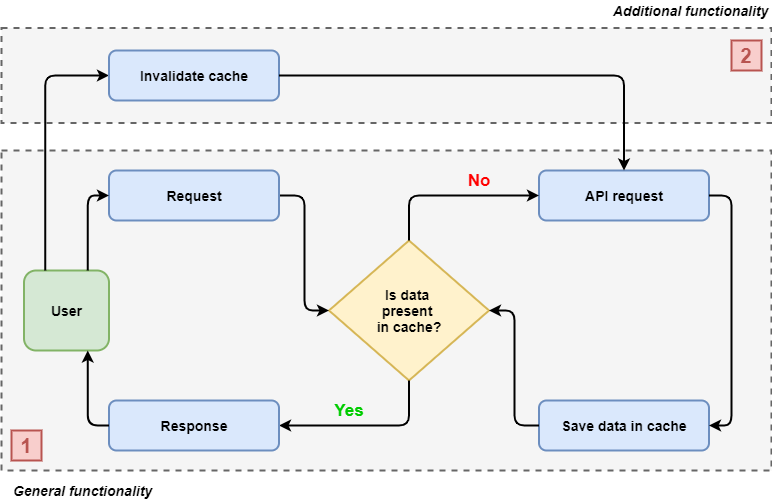
HTTP request caching refers to the practice of storing a response from a previous request so that it can be reused without making another request to the server. This is especially useful for repetitive or infrequently changing data such as:
- Product lists
- User profiles
- Settings and configurations
- Category menus
💡 Why You Should Cache HTTP Requests in Angular 12
Here are some of the key advantages of caching HTTP requests:
- 🚀 Faster Load Times: Reduce wait time for users by reusing previously fetched data.
- 🌐 Lower Server Load: Fewer requests mean lower bandwidth and less processing on the backend.
- 📶 Better Offline Support: Previously cached data can be shown even if the network connection is lost.
- 🧠 Improved User Experience: More responsive and smoother app behavior.
- 💸 Cost-Effective: Reduced API usage helps if you’re working with rate-limited or paid APIs.
🔧 Implementation Example: Angular 12 HTTP Request Caching
Let’s walk through the step-by-step implementation of HTTP caching in Angular 12 using an interceptor and a custom caching service.
Step 1: Set Up a Simple Cache Service
Create a service that will act as a storage layer for your HTTP responses.
typescript
CopyEdit
// cache.service.ts
import { Injectable } from ‘@angular/core’;
import { HttpResponse } from ‘@angular/common/http’;
@Injectable({
providedIn: ‘root’,
})
export class CacheService {
private cache = new Map<string, HttpResponse<any>>();
get(url: string): HttpResponse<any> | undefined {
return this.cache.get(url);
}
set(url: string, response: HttpResponse<any>): void {
this.cache.set(url, response);
}
clear(): void {
this.cache.clear();
}
}
Step 2: Create an HTTP Interceptor
Interceptors allow you to intercept outgoing HTTP requests and incoming responses.
typescript
CopyEdit
// caching.interceptor.ts
import {
HttpEvent,
HttpInterceptor,
HttpHandler,
HttpRequest,
HttpResponse,
} from ‘@angular/common/http’;
import { Injectable } from ‘@angular/core’;
import { Observable, of } from ‘rxjs’;
import { tap } from ‘rxjs/operators’;
import { CacheService } from ‘./cache.service’;
@Injectable()
export class CachingInterceptor implements HttpInterceptor {
constructor(private cacheService: CacheService) {}
intercept(
req: HttpRequest<any>,
next: HttpHandler
): Observable<HttpEvent<any>> {
// Only cache GET requests
if (req.method !== ‘GET’) {
return next.handle(req);
}
const cachedResponse = this.cacheService.get(req.urlWithParams);
if (cachedResponse) {
return of(cachedResponse.clone());
}
return next.handle(req).pipe(
tap((event) => {
if (event instanceof HttpResponse) {
this.cacheService.set(req.urlWithParams, event.clone());
}
})
);
}
}
Step 3: Register the Interceptor in AppModule
Make sure the interceptor is registered in your Angular app.
typescript
CopyEdit
// app.module.ts
import { NgModule } from ‘@angular/core’;
import { HTTP_INTERCEPTORS } from ‘@angular/common/http’;
import { CachingInterceptor } from ‘./caching.interceptor’;
@NgModule({
providers: [
{
provide: HTTP_INTERCEPTORS,
useClass: CachingInterceptor,
multi: true,
},
],
})
export class AppModule {}
⏰ Adding Cache Expiry (Optional but Recommended)
If your data changes often, you may want to implement an expiry mechanism.
Update your cache to store timestamps:
typescript
CopyEdit
interface CachedData {
response: HttpResponse<any>;
addedTime: number;
}
private cache = new Map<string, CachedData>();
private maxAge = 300000; // 5 minutes
get(url: string): HttpResponse<any> | undefined {
const cached = this.cache.get(url);
if (!cached) return undefined;
const isExpired = Date.now() – cached.addedTime > this.maxAge;
if (isExpired) {
this.cache.delete(url);
return undefined;
}
return cached.response;
}
✅ Best Practices for HTTP Caching in Angular
- Cache only GET requests. POST, PUT, and DELETE modify data and should never be cached.
- Use observables efficiently. Use shareReplay() to share cached observables across components.
- Clear cache on logout. If your app includes authentication, clear cache upon logout.
- Avoid over-caching. Not all data should be cached. Use it wisely for infrequently changing content.
🔄 Real-Life Use Cases of Angular HTTP Caching
- E-commerce Applications: Product details, categories, and banners.
- News Websites: Articles list, headlines, and featured stories.
- Dashboards: Reports, metrics, and analytics data.
- Social Media: Profile info, settings, and user activities.
FAQ’s
1. What is HTTP request caching in Angular 12?
HTTP request caching in Angular 12 means storing the response of a request so the app doesn’t need to make the same request again. This saves time and improves performance.
2. Why should I cache HTTP requests in my Angular app?
Caching helps your app load faster, reduces the number of requests to the server, and gives users a better experience — especially when internet is slow or limited.
3. Which HTTP methods can be cached in Angular?
Only GET requests should be cached because they don’t change data. Methods like POST, PUT, or DELETE should never be cached.
4. How do I implement HTTP caching using Angular Interceptors?
You can create a custom service to store responses and use an Angular Interceptor to check the cache before sending the request again.
5. Can I set an expiration time for cached data?
Yes, you can use a timestamp to check how old the cached data is and automatically delete it after a set time (e.g., 5 minutes).
6. Does Angular provide built-in caching features?
No, Angular does not have built-in HTTP caching, but it allows developers to build custom caching using interceptors and services.
7. Should I clear the cache after user logout?
Yes, it’s a good practice to clear cache when a user logs out, especially if the cached data is user-specific or sensitive.
8. What types of data are best for caching in Angular apps?
Static or rarely changing data like product lists, dropdown options, or user settings are great candidates for caching.
Conclusion
Caching HTTP requests in Angular 12 is an excellent way to improve speed, reduce server load, and make your app feel more professional. With a little setup using Angular interceptors and a caching service, you can build efficient and scalable applications that deliver a smooth user experience.